Appointment Editor
Appointments and Events represent time reserved for activities that may involve inviting other people or reserving resources.
Create a New Appointment
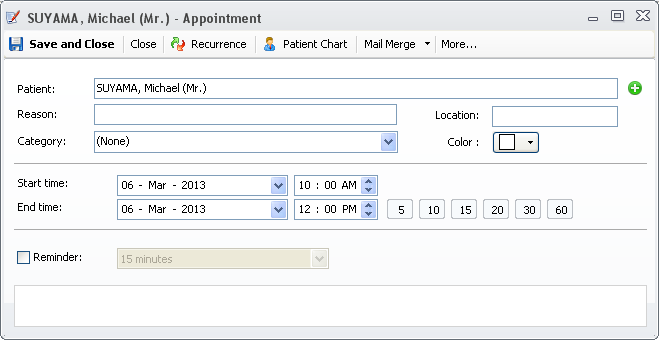
1. In the Calendar view double-click the time when the appointment is scheduled to begin.
The Appointment Editor will be displayed.

2. In Subject text box, type the subject of appointment.
3. Use the Category combo box, and assign a category to your item, in order to particularize it by color and image, for at-a-glance identification.
4. Select the Calendar the appointment is part of (by default the current viewed Calendar).
5. In Start Time and End Time, enter dates and times (or use drop-down menus).
6. Select Reminder check box to specify if and when you want to be reminded.
7. Use the large text area to enter info you want to include regarding the appointment (rich text editing).
8. Click Contacts button to assign Contacts to the appointment.
9. You can send a Mail Notification to the assigned contacts by pressing the Notify button.
10. Set the appointment as being a private one by checking the Private check box or use the Sharing option from toolbar in order to define custom sharing.
11. Click Save and Close button to save the appointment and return to Calendar
Schedule a Recurring Appointment
A recurring appointment on your Calendar contains a double arrow icon.
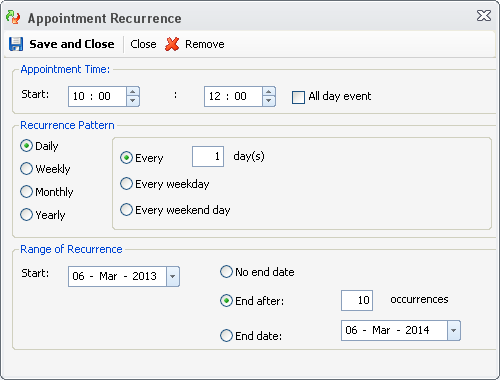
1. While in Appointment editor on menu bar choose Recurrence.
2. The Appointment Recurrence dialog box appears on top of Appointment dialog box

3. In Appointment Time area, enter Start and End times.
4. In Recurrence Pattern area, indicate frequency of appointment (Daily, Weekly, Monthly, or Yearly). When you select an option, the Recurrence Pattern area changes.
5. Enter day, month, and other options as needed.
6. In Range of Recurrence area, enter:
Start date when recurring appointments begin
No End Date if the appointments are not on limited schedule
End After if there is a specific number of appointments
End By if the appointments end on specific date
7. Click Save and Close to close Appointment Recurrence box
Resources
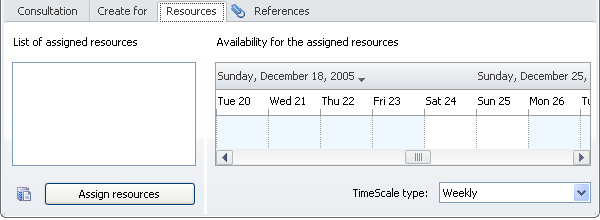
You can reserve Resources for any scheduled appointment, depending on their availability.
1. Select the Resources tab page in the Appointment editor.

2. By pressing the Assign resources button, you can select from the existing resources list the required resources
3. The time grid to the right of each resource name shows the availability of the resources.
Flags
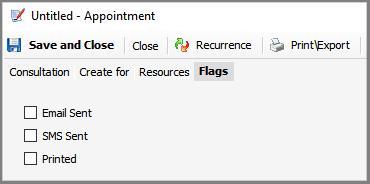
The flags can be set manually from the Flags tab ( More should be pressed ):

The flags are the following:
1. Email Sent
- means that an email related to this event was sent
- this flag is automatically set to Success or Failed when you either Send Reminder or a Communication campaign is executed
2. SMS Sent
- means that an SMS related to this event was sent
- this flag is automatically set to Success or Failed when you either Send Reminder or a Communication campaign is executed
3. Printed
- means that a document related to this appointment was printed or saved to file
- this flag is automatically when Calendar Settings->Daily Merge Merge is executed
Once set they will be displayed in the calendar, if you choose to view their respective images from Calendar Settings
![]()