Consultation Editor
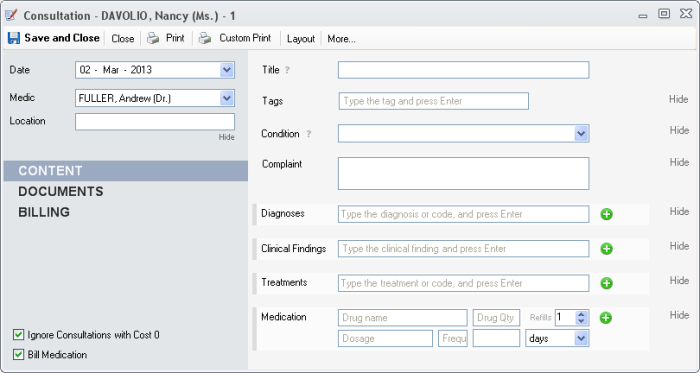
The consultation editor documents a medic's encounter with a patient.
It holds together all the aspects of the visit, like:
- the patient's complaint
- clinical findings
- diagnoses
- treatments
- medication
- attached documents and images
- billing
The use of any field is optional and you can customize the layout by choosing which fields you want visible. The customization is per user, so your settings will not affect other users.
|
|
Creating a New Consultation for an unknown patient

1. Search for an existing patient - type part of the patient's name in the text box, and select one of the hinted patients
2. Register a new patient - press the ![]() button
button

Using of the Consultation Editor
1. Use the left sidebar to enter administrative information (Date, Medic, Location), and change the content of the right panel (Content, Documents, Billing)
2. Use the right panel to enter medical details of the encounter
3. Print or Export the content of consultation by pressing the Print and Custom Print buttons
4. Customize the layout of the window by pressing the Layout button. By checking or unchecking entries under the Layout button you can show or hide sections in the window. The customization is per user, so your settings will not affect other users.
5. Click Save and Close to save the entered consultation
Left sidebar fields
1. Date - the date when the encounter takes place
2. Medic - the medic doing the consultation
3. Addr. Medic - the addressing (owner) medic of the patient. More details in Medic Percents
4. Location - the physical location where the encounter takes place. Can be one of the Locations
5. CONTENT - when selected, the right panel will display the medical content of the consultation
6. PATIENT FORMS - more on this at Integration in Consultation
7. DOCUMENTS - when selected, the right panel will display
8. BILLING -
9. Ignore Consultations with Cost 0 - when checked and no cost set to the consultation, the program will not generate a billable item for the actual consultation
10. Bill Medication - when checked, the program will generate billable items for the entered medication. This is typical for clinics or hospitals who dispense drugs through the in house pharmacy. Also when checked the
Right panel - CONTENT
1. Title - should be something meaningful for the medic, for example "First Consultation". When left empty, it will auto fill with values from diagnoses and treatments
2. Tags - you can set multiple tags to this encounter, for example "preop" or "postop". The tags will propagate to all the components of the consultation (diagnoses, treatments, documents and images)
3. Condition - represents the medical condition and holds together the medical records from multiple sessions, that refer to the same diagnosis. If you already have a created condition, you can select it here and the diagnosis fields will fill with the diagnosis of the condition. The use of this field is optional.
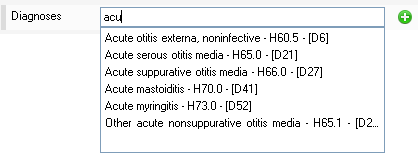
4. Diagnoses - a list of one or more diagnoses, one per line, can be entered here. You can import standard diagnosis codes (ICD,CPT) into the system - Diagnosis Codes , and use the code or the name when entering a diagnosis.

4.1. To enter a new diagnosis to the list, type the name or the code of the diagnosis.If you type part of the name or code, the program will give you hints in a drop down for what you type. You can select one of the hints or press Enter to commit the diagnosis
5. Treatments - a list of one or more treatments, one per line, can be entered here. You can import standard codes (ICD,CPT) - Procedure Codes , and use the code or the name when entering a treatment.

5.1. To enter a new treatment, type the treatment name or code in the box. You can select from hinted treatments. Press Enter or the ![]() button when done.
button when done.
5.2. Remove a treatment from the list by pressing the ![]() button
button
5.3. Enter the consumables for the treatment by pressing the ![]() button. The Bill of Materials editor opens and you can enter the inventory items or services that were consumed doing the treatment. If the entered treatment has an associate Item and Recipe, the Bill of Materials will open automatically after entering the treatment, and will be auto filled with the values from the Recipe. In this case you can leave the bill as it is and save it, or you can adjust the quantities.
button. The Bill of Materials editor opens and you can enter the inventory items or services that were consumed doing the treatment. If the entered treatment has an associate Item and Recipe, the Bill of Materials will open automatically after entering the treatment, and will be auto filled with the values from the Recipe. In this case you can leave the bill as it is and save it, or you can adjust the quantities.
6. Medication - the list of prescribed drugs. The boxes will hint values from the Drugs Categories when Bill Medication is not checked, and from Items when is checked
7. Details - is a multi line free text editor. It have rich text capabilities when you press the More button on the tool bar.
It also supports the entering of formatted questionnaires for fast data entry by pressing the Insert Questionnaire link.
Right panel - Documents
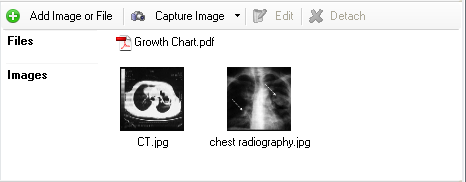
You can attach any file or image to a consultation. These will be saved as Patient Documents and will be available under Patient Documents and Patient Images

1. Add Image or File - you can browse an image or file on the computer
2. Capture Image - capture images from a connected devices, like scanners, cameras or medical imaging devices
3. Detach - remove the link from consultation to document. The actual document will not be deleted
Prescribing Drugs in Consultation Editor
Scenario 1 - Prescribe billable drugs
The drug names are hinted from the Items of type drug. The Drug Qty field is not available, as it should be contained in the items names

The program will warn if not enough drugs in company stock:

Scenario 2 - Prescribe drugs for external pharmacy
The drug names are hinted from the Drug Names. Also the of type Drug Qty is available for a more relaxed prescription entry
