3.3. Tutorial - Prepaid Items
The prepaid items differ from prepayment as they specify exactly which items were prepaid.
Prepaid Items can be entered into the system with an invoice and invoice payment. The invoice lines for prepaid items have the Delivered Qty lower than the Billed Qty
Summary
1. Add Prepaid Items from Consultation
2. Add Prepaid Items from a New Invoice
3. Add Prepaid Items with Special Offers
4. View and Deliver the Prepaid Items
5. Deliver Prepaid Items automatically
1. Add Prepaid Items from Consultation
Open a patient in the Patient Chart->Timeline and press Add Consultation
In the consultation enter the treatment or drug which you want to be prepaid, and save the consultation

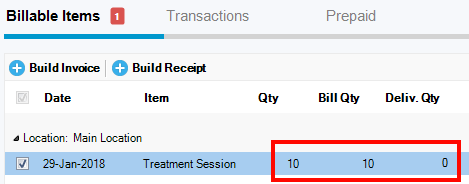
Go to Patient Chart->Billing->Billable Items and fill the Qty field with the item count you want billed.
In the Delivered Qty enter the quantity which the patient received so far. For example, if this is prepayment for 10 sessions in the next month, enter as bellow:

Next press Build Invoice . In the invoice, the line of the prepaid Item should look like bellow:

If you want to add change prices, like adding discounts, you can:
- edit the invoice line and set the Unit Price of your choosing, or use the Discount field of the line to apply discount. When done press the Change Line button
- press the Set Adjustment in the main menu of the invoice editor to modify the prices of all items
When done, press Save and Close to save the invoice and proceed to save also the associated invoice payment
2. Add Prepaid Items from a New Invoice
Go to Patient Chart->Billing and create a new invoice from Add Transaction->Add Invoice
In the invoice editor enter the prepaid items as invoice lines with the prices you choose, and make sure that the Qty. Delivered is either 0 or lower than Qty billed

When done, press Save and Close to save the invoice and proceed to save also the associated invoice payment
3. Add Prepaid Items with Special Offers
If you plan to offer special prices to clients if they pay in advance, you can create Special Offers .
A special offer can specify for example that if the client purchases 10 items, he will get a special price per item. More on how to create special offer your have at Special Offers
In the example bellow, we'll consider that if the client purchases 10 items, the item price will be 80 instead of 100, and no items will be delivered on billing:

Next go to Patient Chart->Billing and create a new invoice from Add Transaction->Add Invoice
In the invoice editor press the Add Special Offer link and select the wanted offer

The invoice will be automatically filled up with the lines in the offer. Notice that the Qty is 10, Delivered Qty is 0 and the Unit Price is 80, as in the offer

Next continue by saving the invoice and the associated invoice payment
4. View and Deliver the Prepaid Items
Go to Patient Chart->Billing->Prepaid Items.
After you complete a session with the patient, to deliver a prepaid item, simply click Deliver as bellow

To view the prepaid items of all patients, go to Company->Prepaid Items
5. Deliver Prepaid Items automatically
To integrate with the flow of your organization, we support the delivery\reconciliation of prepaid items integrated with the medical records
In this sense, a medic can enter in the medical records that a session was provided in a Consultation:

This will automatically appear under Patient Chart->Billing->Billable Items

When you press Build Invoice, the system will notice that you have prepaid items, and will ask to deliver\reconcile from those, instead of billing again this patient

If you choose Yes, the quantity of billable items will be removed from the Prepaid Items, and the billable items will be considered billed